Computation system comparison
On 9 July 2020, I was tasked by Vojta to install Daniela Kropáčková’s Python code for calculating the plasma position on three computing facilities available at GOLEM: the Abacus cluster, the Raspberry B and the Odroid C-4. The goal is to judge the relative computation speed, learn remote access to Linux environments and lay foundations for running Python codes on each of the machines.
This document sums up the results.
Session notes
9 July 2020
Odroid, Abacus and Raspberry can only be accessed from the internal network via their IP addresses; they cannot be connected to remotely. However, it seems like one can log into the Golem computer
and then continue to Abacus.
15 July 2020
This time I’m on my own, waiting for Filip Papoušek’s probe measurements to start. Since running Jupyter through ssh -X is very slow on Odroid, I tried installing NoMachine, a free remote desktop software I have (good) experience with.
16 July 2020
Note to future me: research Jupyterhub.
Odroid
Odroid C-4 (Odroid for short) is a single-board computer with the ARM 64bit architecture. Vojtěch Svoboda bought it because he wanted to know how well it can replace a conventional computer.
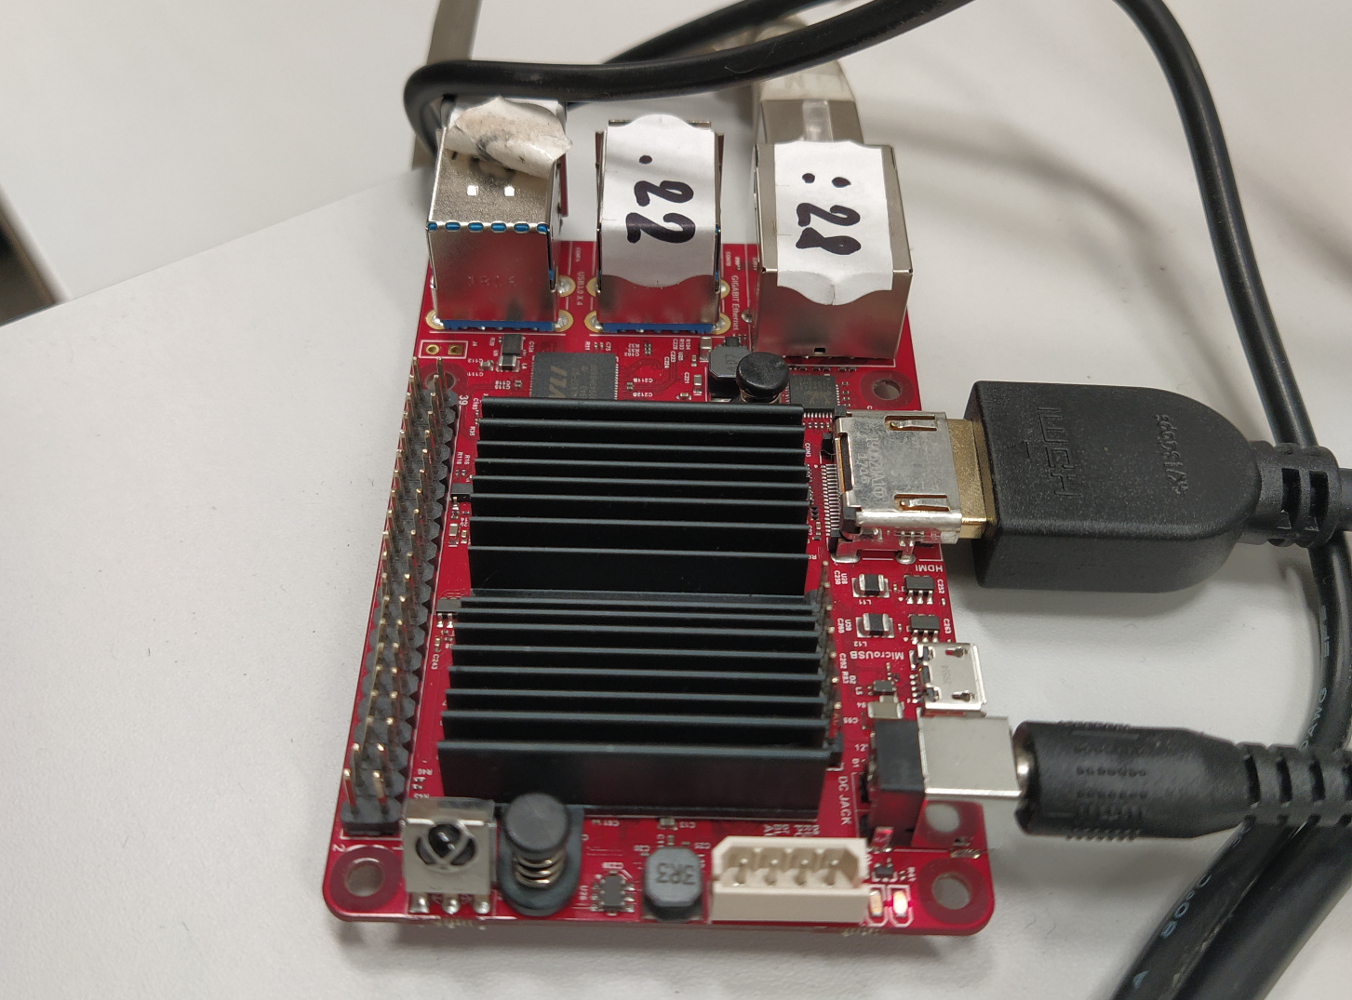
To connect to the Odroid (watch out, it must be turned on), one may use SSH:
The username is odroid and the password is also odroid. Superuser password is also odroid. The board runs Ubuntu 20.04 LTS (Focal Fossa)
cat /etc/os-release

NAME="Ubuntu"
VERSION="20.04 LTS (Focal Fossa)"
ID=ubuntu
ID_LIKE=debian
PRETTY_NAME="Ubuntu 20.04 LTS"
VERSION_ID="20.04"
HOME_URL="https://www.ubuntu.com/"
SUPPORT_URL="https://help.ubuntu.com/"
BUG_REPORT_URL="https://bugs.launchpad.net/ubuntu/"
PRIVACY_POLICY_URL="https://www.ubuntu.com/legal/terms-and-policies/privacy-policy"
VERSION_CODENAME=focal
UBUNTU_CODENAME=focal
on the aarch64 (also known as ARM64) architecture.
lscpu

Architecture:        aarch64
CPU op-mode(s):      32-bit, 64-bit
Byte Order:          Little Endian
CPU(s):              4
On-line CPU(s) list: 0-3
Thread(s) per core:  1
Core(s) per socket:  4
Socket(s):           1
Vendor ID:           ARM
Model:               0
Model name:          Cortex-A55
Stepping:            r1p0
CPU max MHz:         1908.0000
CPU min MHz:         100.0000
BogoMIPS:            48.00
Flags:               fp asimd evtstrm aes pmull sha1 sha2 crc32 atomics fphp asi
                     mdhp
A faster way to connect to it is to simply make use of the HDMI and USB ports it has to plug in a computer screen and a keyboard+mouse. The Odroid is turned on by plugging it into a power outlet; it is turned off by pulling it out. I also installed NoMachine on it (software for remote desktop connection, see below) but it lags so much that plugging the Odroid physically to a monitor and keyboard+mouse is a smaller hassle.
To make sure all software is up-to-date, we ran:
One package wouldn’t install (libsdl2.2-0.0) for an unknown reason, preventing the installation of ffmpeg, one of the packages needed for running Daniela’s script. In the end we were able to solve this by:
Odroid’s freezing problem
I encountered this problem whwn changing the keyboard layout from English to Czech. When I click the keyboard icon in tool bar, a white rectangle appears and the desktop stops responding. This can be solved by logging into Odroid via SSH and using the command:
The remote desktop will go black and, after a minute, restart with the user logged off.
Installing NoMachine on Odroid
NoMachine is software which creates a remote desktop of a chosen computer. It’s good for handling graphics which would be slow through ssh -X.
To use the remote desktop, one must first install NoMachine at the remote computer (here Odroid). I did this by finding the NoMachine installation package for aarch64 (the architecture of Odroid C-4). Then, using Firefox I downloaded this package. Then I just followed the installation instructions at the page cited above (pure command line).
The second step is to install NoMachine at your local computer. This is done following the same instructions as above, just download the package suitable for your architecture.
If you’re physically at GOLEM, all you need to do is connect to the GOLEM wifi (called tokamak) or the ethernet network. Then your computer will automatically detect Odroid as available for a NoMachine connection. No set-up is needed, just open NoMachine and double-click Odroid.
If you want to access Odroid remotely, follow these instructions (original tutorial):
- On your computer, open NoMachine and click “New”.
- Select the NX protocol.
- Enter
147.32.5.212as the host and20848as the port. - Select Password as the authentication method.
- Select Don’t use a proxy.
- Name the connection as you like (“Odroid” is recommended).
- In your connection list, double-click Odroid. Write
odroidfor the username andodroidfor the password and select to remember the password.
If this doesn’t work, you may need to check the Odroid IP address. To do this, connect first to Dirigent and then to Odroid using SSH.
The password for golem is rabijosille. Next, run NoMachine.
In the window that appears, check the IP address beginning with nx://. It might have changed. If it still doesn’t work, figure it out and rewrite this tutorial.
The remote connection using NoMachine isn’t fluid, but it beats SSH.
Installing Python on Odroid
We tried installing Anaconda first, but after procuring the 64bit installation file, bash complained that
WARNING:
Your operating system appears not to be 64-bit, but you are trying to
install a 64-bit version of Anaconda3.
Are sure you want to continue the installation? [yes|no]
This was caused by the CPU architecture, as Anaconda isn’t developed for aarch64. We tried switching to Miniconda, but we got the same result. In the end, we installed Python3 directly using apt-get and pip3. We installed pip3, NumPy, Matplotlib, SciPy, Pandas and HoloViews with:
sudo apt-get install python3-pip
pip3 install numpy
sudo apt-get install python3-matplotlib
sudo apt-get install python3-scipy
sudo apt-get install python3-pandas
pip3 install holoviews
Then we installed Jupyter using:
The first one took quite a while. Now we were able to run Jupyter using
so we imported Daniela’s source code and tried running it. There were some package issues (described above) but in the end the code worked fine.
Abacus
Abacus is a computing cluster GOLEM has at its disposal. We connected to it via SSH:
or
Abacus is a Linux server which runs Debian GNU/Linux 10
cat /etc/os-release

PRETTY_NAME="Debian GNU/Linux 10 (buster)"
NAME="Debian GNU/Linux"
VERSION_ID="10"
VERSION="10 (buster)"
VERSION_CODENAME=buster
ID=debian
HOME_URL="https://www.debian.org/"
SUPPORT_URL="https://www.debian.org/support"
BUG_REPORT_URL="https://bugs.debian.org/"
with the 64bit architecture.
lscpu

Architecture:        x86_64
CPU op-mode(s):      32-bit, 64-bit
Byte Order:          Little Endian
Address sizes:       43 bits physical, 48 bits virtual
CPU(s):              32
On-line CPU(s) list: 0-31
Thread(s) per core:  2
Core(s) per socket:  16
Socket(s):           1
NUMA node(s):        4
Vendor ID:           AuthenticAMD
CPU family:          23
Model:               1
Model name:          AMD EPYC 7281 16-Core Processor
Stepping:            2
CPU MHz:             1196.447
CPU max MHz:         2100.0000
CPU min MHz:         1200.0000
BogoMIPS:            4192.02
Virtualization:      AMD-V
L1d cache:           32K
L1i cache:           64K
L2 cache:            512K
L3 cache:            4096K
NUMA node0 CPU(s):   0-3,16-19
NUMA node1 CPU(s):   4-7,20-23
NUMA node2 CPU(s):   8-11,24-27
NUMA node3 CPU(s):   12-15,28-31
Flags:               fpu vme de pse tsc msr pae mce cx8 apic sep mtrr pge mca cmov pat pse36 clflush mmx fxsr sse sse2 ht syscall nx mmxext fxsr_opt pdpe1gb rdtscp lm constant_tsc rep_good nopl nonstop_tsc cpuid extd_apicid amd_dcm aperfmperf pni pclmulqdq monitor ssse3 fma cx16 sse4_1 sse4_2 movbe popcnt aes xsave avx f16c rdrand lahf_lm cmp_legacy svm extapic cr8_legacy abm sse4a misalignsse 3dnowprefetch osvw skinit wdt tce topoext perfctr_core perfctr_nb bpext perfctr_llc mwaitx cpb hw_pstate sme ssbd sev ibpb vmmcall fsgsbase bmi1 avx2 smep bmi2 rdseed adx smap clflushopt sha_ni xsaveopt xsavec xgetbv1 xsaves clzero irperf xsaveerptr arat npt lbrv svm_lock nrip_save tsc_scale vmcb_clean flushbyasid decodeassists pausefilter pfthreshold avic v_vmsave_vmload vgif overflow_recov succor smca
We downloaded the Anaconda 64bit installer and installed Anaconda without a problem. To use the Anaconda Python3 by default, we added the line
into the ~/.bashrc and ~/.profile files and restarted the command line. Jupyter can now be initiated with
or with:
Unfortunately both of these options are rather slow because of the X11 forwarding. There are two options: install a remote desktop programme on Abacus (such as X2Go) or convert Daniela’s script from its Jupyter Notebook form to a Python script which can be run from the command line.
Raspberry B
Daniela borrowed the Raspberry machine for the 2020 summer holiday. Her words from the end of August 2020:
"I installed Miniconda and the required packages on the Raspberry I borrowed. I managed to run the script, but the calculation is even slower than on my own computer.
The longest part of the scipt is the frame conversion from the UTF-8 format to the mp4/avi/gif format. I’ve been thinking what affects the writing speed the most and I think it depends on the processor frequency, RAM size and the art of using the processor kernels. I can’t do anything about the former two, but I’ll try to rewrite the programme so that the processor uses four kernels instead of the current one. I found a package called multiprocessing which should enable this and I’m working it into the script."