New probe manipulator
In September 2020, I, Petr Mácha and Martina Lauerová were tasked to commission a new probe manipulator on the bottom port of the GOLEM tokamak. The hardware was produced by Pfeiffer under Vojta’s specific instructions “it must be plug-and-play”. It consists of two manipulators, a radial one (it goes round and round) and an axial one (it goes there and back), two controllers for the manipulators, two power sources for the controllers and vacuum technology items which can connect the manipulators to the tokamak chamber.
Todo
- make a photo of all the components prior to assembly
- make a detail photo of the power supply box
- make a detail photo of the controller
Manuals
- C5-E controller: long manual, catalogue entry, short manual
- Radial controller: manual, technical specifications and 3D model
- Axial controller: manual, technical specifications and 3D model
Stepper motors
Cabling motor - controller - power supply - powet outlet
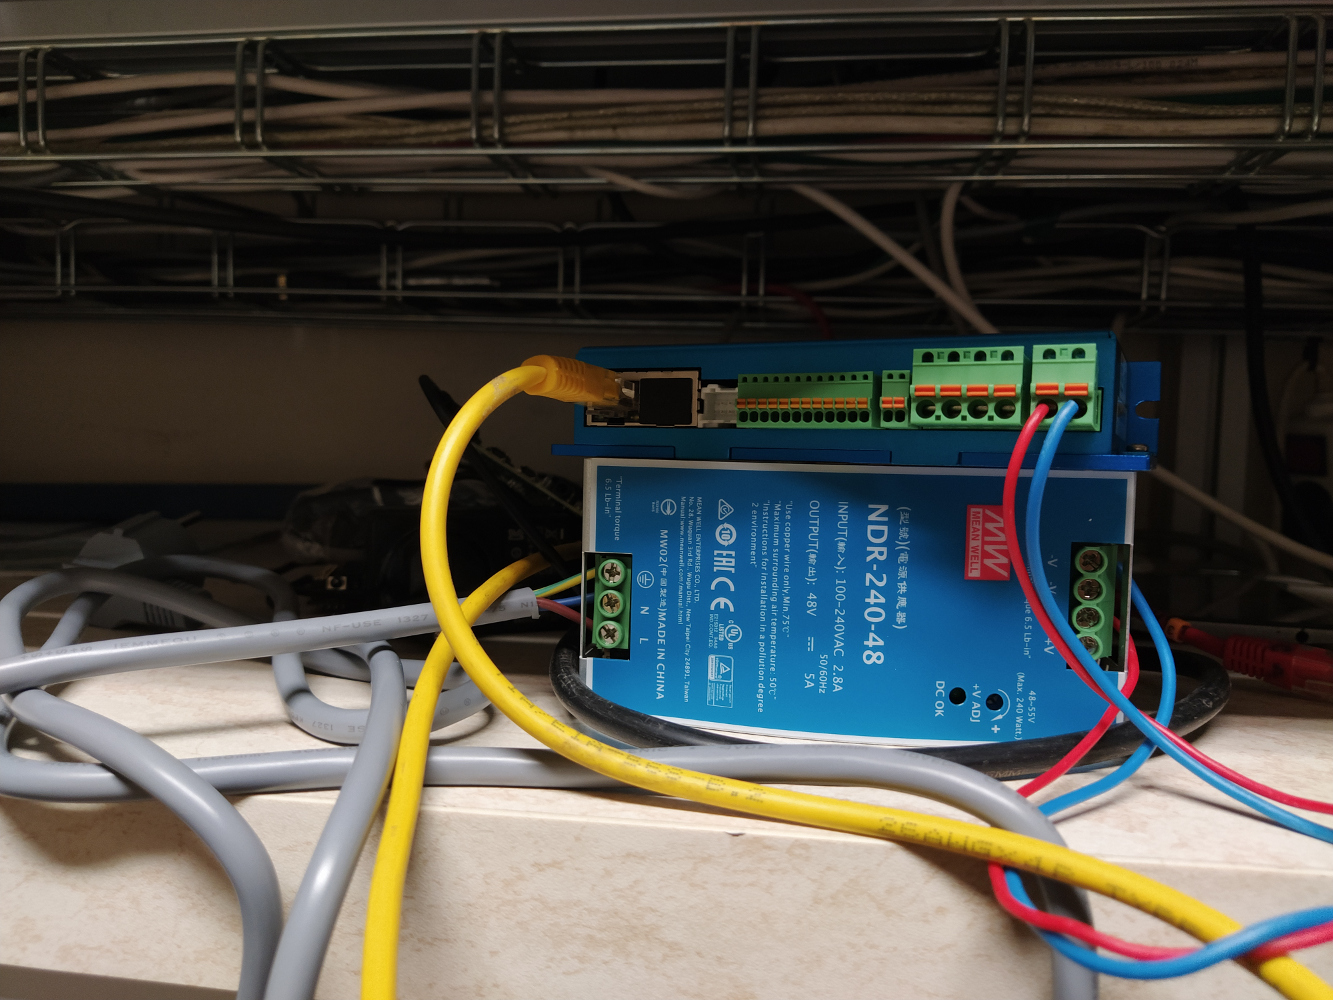
A regular power outlet cable (grey in the photo above) was shaven and its three wires were exposed: brown “phase” (live, supplies the electrical power), blue “null” (the other pole to “phase”, usually grounded) and yellow-green “ground” (always grounded). The wires were inserted into the appropriate slot on the power supply box: L for live, N for null and the ground symbol for the ground. Then, two wires (blue and red in the photo) were used to connect the power supply box slot \(-V\) and \(+V\) to the corresponding controller slots.

Our stepper motor is bipolar and two-phase. It has four pairs of coils inside the stator (refer to the video above) and 8 wires lead out of it: red, red-white, blue, blue-white, green, green-white, black and black-white. Using a multimeter, we verified that they form four pairs, corresponsing to each pair of coils. There are two ways to connect a bipolar drive: series and parallel. Series connection provides higher torque (greater rotation force, think of a big buff muscle man), while parallel connection provides higher speed (faster rotation, think of a lithe athlete). For our purposes the motors will have plenty of time to turn, so it’s a coin toss. We chose the series connection.

The connection of the 8 motor wires is shown in the table above. Two pairs of cables were electrically connected (curled around one another and secured in place with plastic tape) according to the scheme in the line “Bipolar Drive Series Connection”. The remaining 4 wires were inserted into the correct slots in the controller: A, A-, B and B-.
Finally, the controller was plugged into the local network using an Ethernet cable (yellow).
Communicating with the controller
The manual of the C5-E controller describes how to connect to the controller instructions via a USB cable and the Plug & Drive application which only works for Windows. However, we want to control the motor remotely and from Linux. We’re still working on that.
Object dictionary and its objects
Communicating with the controller is based on a so-called object dictionary. This is a set of “objects” - variables such as “polarity of the motor connection” or “target position of motor movement” or “maximum current flowing through the motor windings”. Every object is indexed by a 4-digit hexadecimal code. For instance, \(607E_h\) is the index of the object Polarity and \(607A_h\) is the index of the object Target Position. The \(h\) stands for “hexadecimal” and serves to diferentiate hexadecimal numbers from normal decimal numbers. More than a half of the controller manual is taken up by the description of the object dictionary: which objects there are, what their indexes are, what values they can have and what these values mean.
The controller is given directions how to power the motor windings through the values of objects in the object dictionary. For instance, on page 303 one can find that the object \(607E_h\) Polarity has the value of a 2-digit number (in the hexadecimal notation). It’s default value is \(00_h\). That means that in the binary notation, it has \(2 \cdot 4 = 8\) numbers (bits). In the manual you can find that if the most significant bit (7th, starting from the right and counting from 0) is 1, the motor winding polarity is reversed in the Profile Position Mode and the Cyclic Synchronous Position Mode. If this bit value is 0, the motor winding polarity is as connected to the controller. To move the motor, it seems to be required to set the object values in real time.
How to assign a value to an object
Every object in the object dictionary has an index and a subindex, both in the hexadecimal notation. It is written as follows: <Index>:<Subindex>. If no subindex is listed, the subindex is \(00_h\).
Example 1: Object \(1003_h\), subindex \(05_h\) can be addressed as \(1003_h:05_h\). Object \(6040_h\), subindex \(00_h\) can be addressed as \(6040_h\) or \(6040_h:00_h\).
Example 2: To set the value of object \(1003_h\), subindex \(05_h\), bit 3 (the fourth from the right, corresponding to \(2^3\)) to 1 in bash (e.g. in the configuration file, see below), use the notation \(1303:05.3 = 1\).
The configuration file cfg.txt
The controller can be given basic directions and object values (such as “don’t drive currents larger than 1 A”) through the configuration file cfg.txt. To access this file, power up the controller and connect it to your computer via USB. It will open as a data storage containing several files, among them cfg.txt. Excerpt from the controller manual:
The
cfg.txtconfiguration file is used to preset values for the object dictionary to a certain value during startup. This file uses a special syntax to make accessing the objects of the object dictionary as easy as possible. The controller evaluates all assignments in the file from top to bottom.
The preset configuration file reads:
;File was deleted. To configure the drive, insert new lines like this: 2031=3000
;Format: index (4-hexdigit without prefix), subindex (2-hexdigit without prefix), value (up to 8-hexdigith with prefix or dec), switch (1-hexdigit without prefix)
;Possible assignments:
;Assignment without subindex. Subindex is zero.
;6040=6
;Assignment with subindex
;6040:00=6
;Bitwise OR assignment
;6040:00|=0x02
;Bitwise AND assignment
;6040:00&=0xFFFD
;Bit assignment set
;6040:00.0=1
;Bit assignment clear
;6040:00.0=0
;Assignment depending on config switch, if available
;#1:6060:00=2
Here all the lines are commented by the leading ;. The lines with numbers are all object value assignment, see the previous section.
Remote communication with the controller
The controller is connected into the GOLEM network via ethernet. Its local IP address is 192.168.2.31. In order to communicate with it, first log into the golem command line
ssh username@golem.fjfi.cvut.czYou can ping the controller to find if it’s on.
ping 192.168.2.31The controller is powered via a switch which can be opened and shut from the command line. Use this to reboot the controller.
# Activate control over the switch (something like login)
curl -sd 'pw=1' http://192.168.2.83/login.html >/dev/null

# Switch on
curl -sd "cte4=1" http://192.168.2.83/status.html >/dev/null

# Switch off
curl -sd "cte4=0" http://192.168.2.83/status.html >/dev/null
To write into the object dictionary, use the curl command. Let’s demonstrate the configuration of the object 2031:00. This object corresponds to maximum permissible motor current (motor protection) in mA.
To GET value of this object simply use command: curl http://192.168.2.31/od/2031/00
To SET value of this object use command: curl -X POST http://192.168.2.31/od/2031/00 -d '"000003E8"' !!!!! Value must be in hexadecimal format !!!!!
Example of bash script to make radial motor move:
#!/bin/bash
#curl -X POST http://192.168.2.31/od/3212/02 -d '"1"'        # trying to change polarity
curl -X POST http://192.168.2.31/od/205B/00 -d '"0"'         # trying to change polarity
curl -X POST http://192.168.2.31/od/607E/00 -d '"0"'         # trying to change polarity
curl -X POST http://192.168.2.31/od/6060/00 -d '"02"'        # setting velocity mode
#curl -X POST http://192.168.2.31/od/6060/00 -d '"FF"'       # experiments with modes
curl -X POST http://192.168.2.31/od/6042/00 -d '"000A"'      # setting target velocity to 10 (rounds per minute probably)
curl -X POST http://192.168.2.31/od/6040/00 -d '"0006"'      # settings last bits to (110) means enable voltage and quick stop

sleep 1
curl -X POST http://192.168.2.31/od/6040/00 -d '"0007"'      # setting last bits to (111) means enable voltage, quick stop and switched on, whichs probably starts the movement
sleep 1
sleep 1
curl -X POST http://192.168.2.31/od/6040/00 -d '"0000"'      # disabeling everything to stop the movement
Utility scripts
Set bin to value
This short script is an prototype for simpler and smarter http control. The input \(f\), coresponding to some hexadecimal number, will be replaced with output of curl -X GET command in the future. The idea is to be able to change bit value more easily.
#!/bin/bash
index=$1
subindex=$2
bit=$3
value=$4
f=$( curl -s -X GET http://192.168.2.31/od/${index}/${subindex} )
echo "Before: $f"
length=${#f}
len=$((length-2))
str=""
strn=""
for ((i=1;i< $len;i=i+2))
do
        var=$( perl -e 'printf "%08b\n", 0x'"${f:i:2}")
        str+="${var}"
done
declare -a a   # define array a
for ((i=0; i<${#str}; i++)); do a[$i]="${str:$i:1}"; done
size=${#str}
a[$((-1-$bit))]=$value
for ((i=0;i< $size;i=i+1))
do
        strn+=${a[$i]}
done
out=$( printf '%x\n' "$((2#$strn))")
final=${out^^}
if [ $len -eq 8 ]; then
        if [ ${#final} -eq 1 ]; then
                output="0000000"
        fi
        if [ ${#final} -eq 2 ]; then
                output="000000"
        fi
        if [ ${#final} -eq 3 ]; then
                output="00000"
        fi
        if [ ${#final} -eq 4 ]; then
                output="0000"
        fi
        if [ ${#final} -eq 5 ]; then
                output="000"
        fi
        if [ ${#final} -eq 6 ]; then
                output="00"
        fi
        if [ ${#final} -eq 7 ]; then
                output="0"
        fi
        if [ ${#final} -eq 8 ]; then
                output=""
        fi
fi
if [ $len -eq 4 ]; then
        if [ ${#final} -eq 1 ]; then
                output="000"
        fi
        if [ ${#final} -eq 2 ]; then
                output="00"
        fi
        if [ ${#final} -eq 3 ]; then
                output="0"
        fi
        if [ ${#final} -eq 4 ]; then
                output=""
        fi
fi
output+="${final}"
curl -X POST http://192.168.2.31/od/${index}/${subindex} -d $( echo \"${output}\" )
echo "After:  $( curl -s -X GET http://192.168.2.31/od/${index}/${subindex} )"
Input example. Four parameters are presented. First is index, second is subindex, third is bit and the last one value of selected bit. Example of usage is on the next line: Lets assumme an object - 205B:00.0 (means index 205B, subindex 00 and bit 0). The object has value 00000001. The last bit’s (bit indexed by 0) value will be change to 0 by this command:
./set "205B" "00" 0 "0"
Output has the following form:
Before: "00000001"
After:  "00000000"